OpenID Connect authentication (Single Sign-On)
New in version 2.6.0.
MWDB Core supports authentication using an external identity provider. This functionality is implemented using the OpenID Connect (OIDC) protocol, which is integrated with the MWDB authentication system.
To enable OIDC authentication, configure MWDB using one of the following methods:
Set the environment variable:
MWDB_ENABLE_OIDC=1or enable it in the
mwdb.iniconfiguration file:[mwdb] ... enable_oidc=1
If you want to test this functionality, the easiest way is to set up the environment with a compose/compose.with-oidc.yml file.
It deploys an external identity provider based on Keycloak
Development environment can be configured automatically using script described in dev/oidc/README.md.
Step-by-step configuration
In this section we will configure authentication via Keycloak using development environment as an example. In principle, it should work with any other OIDC-capable system.
Start the environment using the following command:
$ ./compose.sh --with dev --with oidc up -d
Note
Using the OpenID Connect protocol requires correct base_url to be set in configuration.
This value is used for generating redirect_uri therefore it is essential to build a correct URI. Validate your configuration whether base_url actually points to the URI used by users.
Step 1: Configure MWDB client in Keycloak
Go to the Keycloak’s admin console (http://127.0.0.1:8080/admin/master/console/ - default credentials user:bitnami) and create new realm mwdb

Then in mwdb realm go to Client and click Create client. Set proper Client ID that will be used by MWDB for authentication.
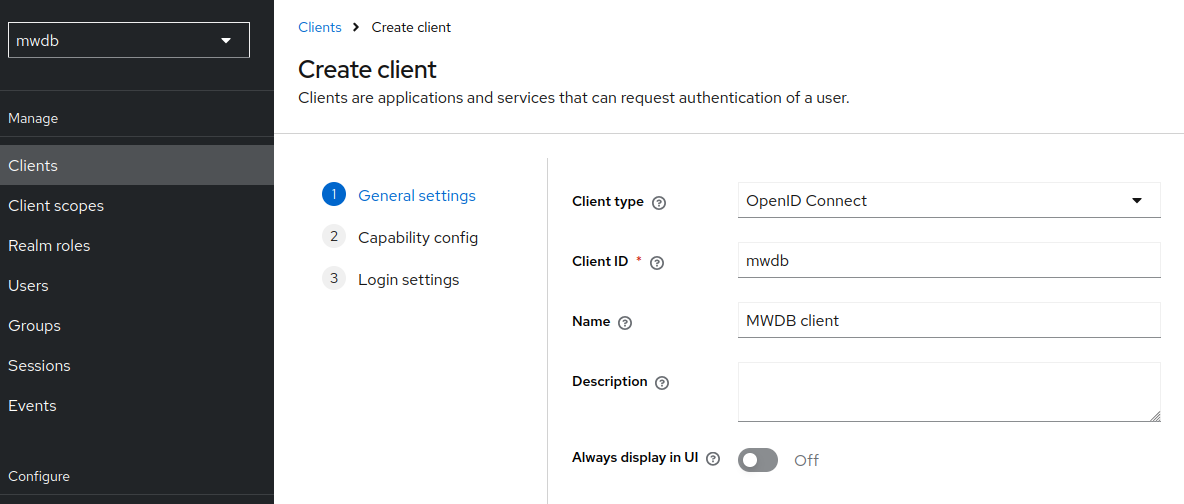
In capability config enable Client authentication and enable Standard flow as Authorization Code Flow is the only OpenID Connect flow supported by MWDB.
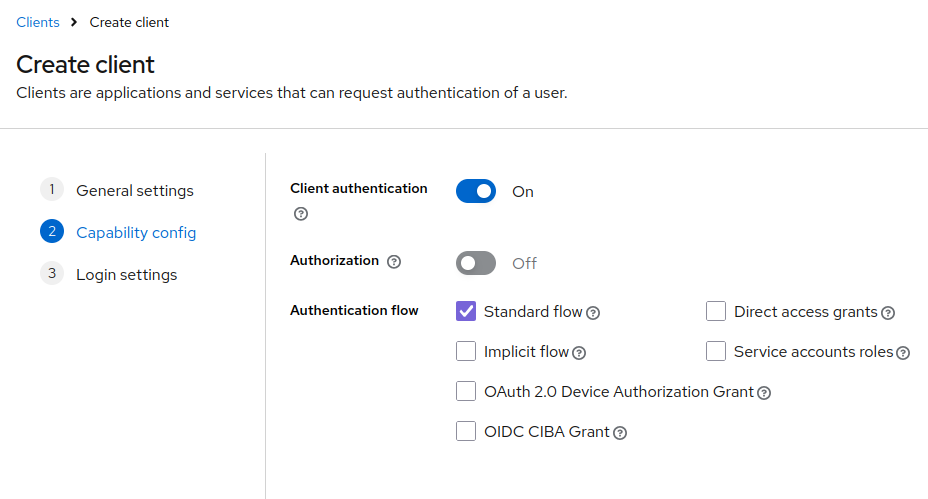
Finally set MWDB URLs. Correct redirect URL for MWDB is http://<mwdb url>/oauth/callback.

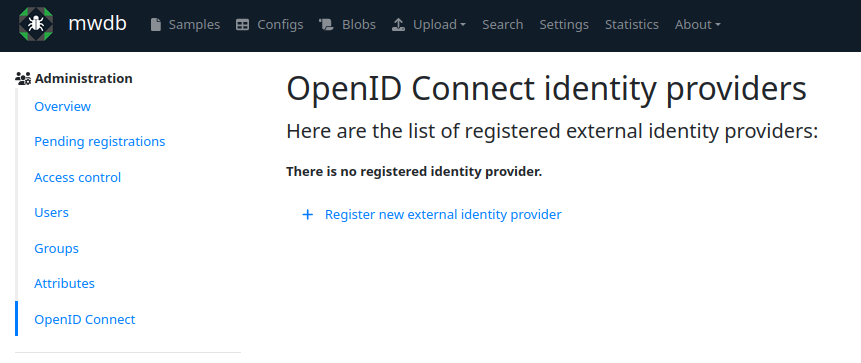
Step 2: Create OpenID Provider in MWDB
Then go to the MWDB, log in as admin, navigate to Settings and click on OpenID Connect tab (http://127.0.0.1/settings/oauth).
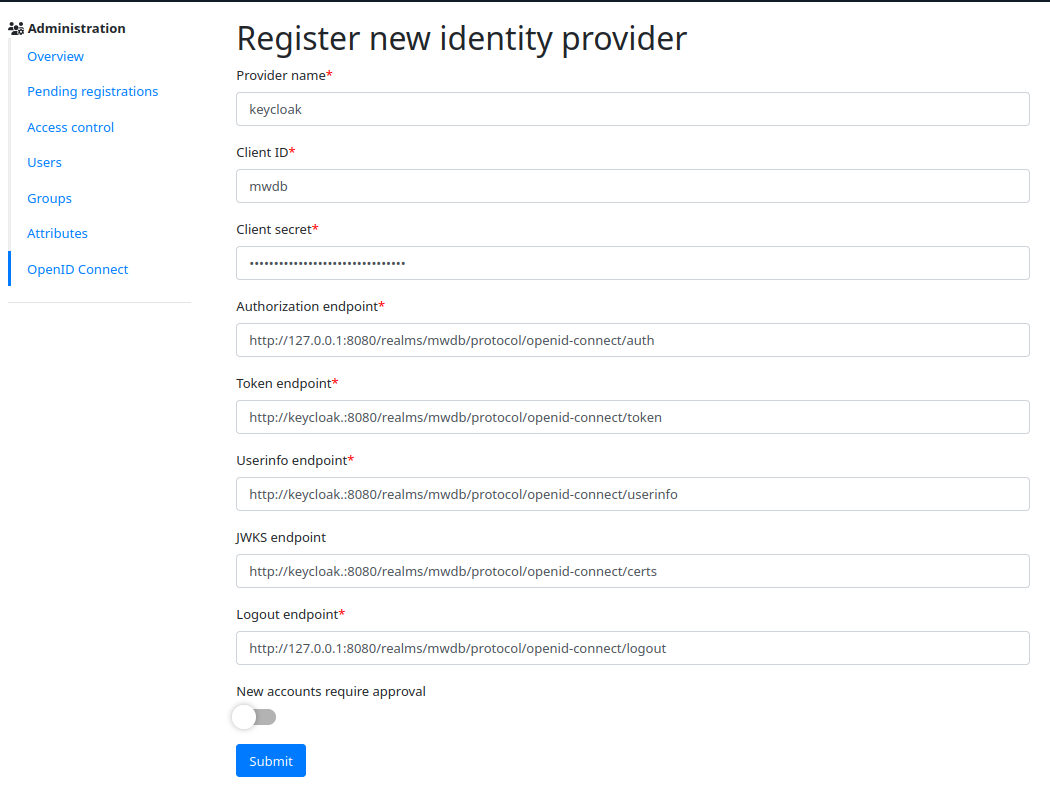
Click on Register new external identity provider
Then fill up form with OpenID provider settings:
Provider namewill identify the name of provider for your usersClient IDshould be set to the same ID as in Keycloak during creating client (in our casemwdb)Client secretcan be retrieved from Keycloak. Go to client settings in Keycloak and you’ll find Client Secret inCredentialstab.Endpoints can be found in
http://127.0.0.1:8080/realms/mwdb/.well-known/openid-configuration.userinfo_endpoint,token_endpointandjwks_endpointshould be set from the point of view of the MWDB server as they’ll be called server-side, so in case of Docker Compose environment you need to change them tohttp://keycloak.:8080/.authorization_endpointandlogout_endpointURLs should point at127.0.0.1:8080- they’ll be visited by user’s browser.
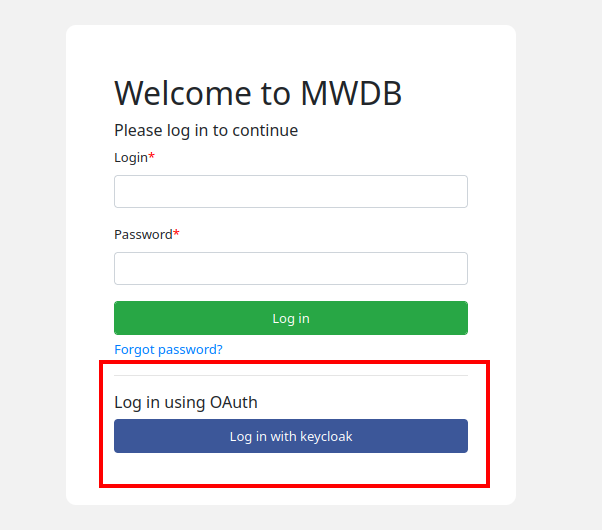
On Login page, you should see a new option:
Step 3: Binding account to OpenID identity
This step will show you how to bind existing account to allow login via OIDC. Let’s try it with ‘admin’.
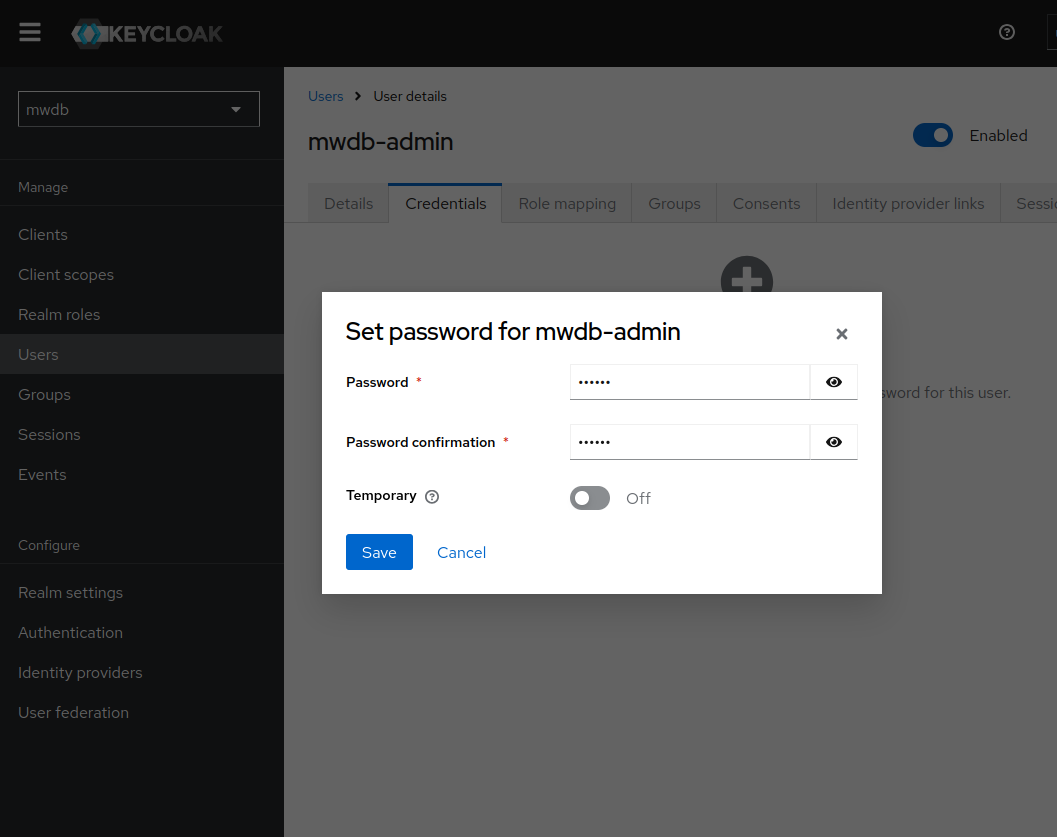
First, we need to create a new user in ‘mwdb’ realm on the Keycloak side. Go to Keycloak, then Users and click on Create new user.
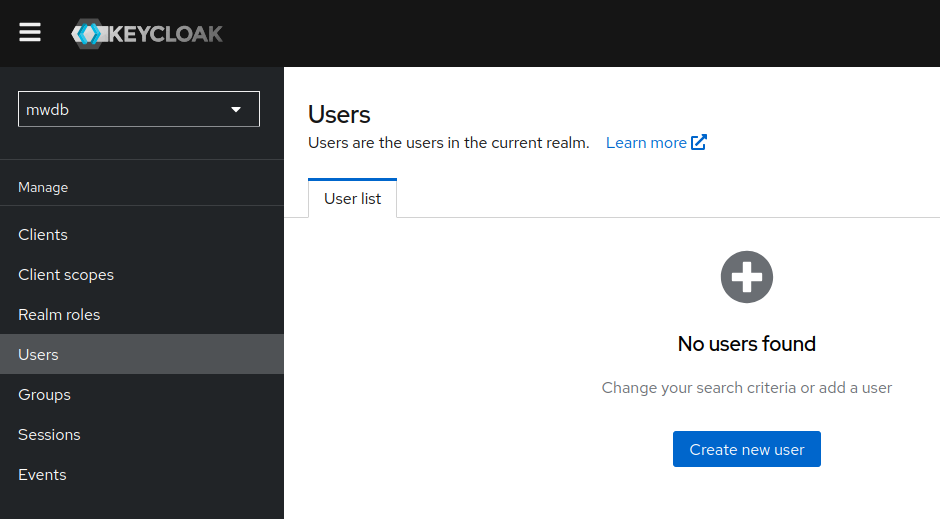
Let’s create an mwdb-admin.
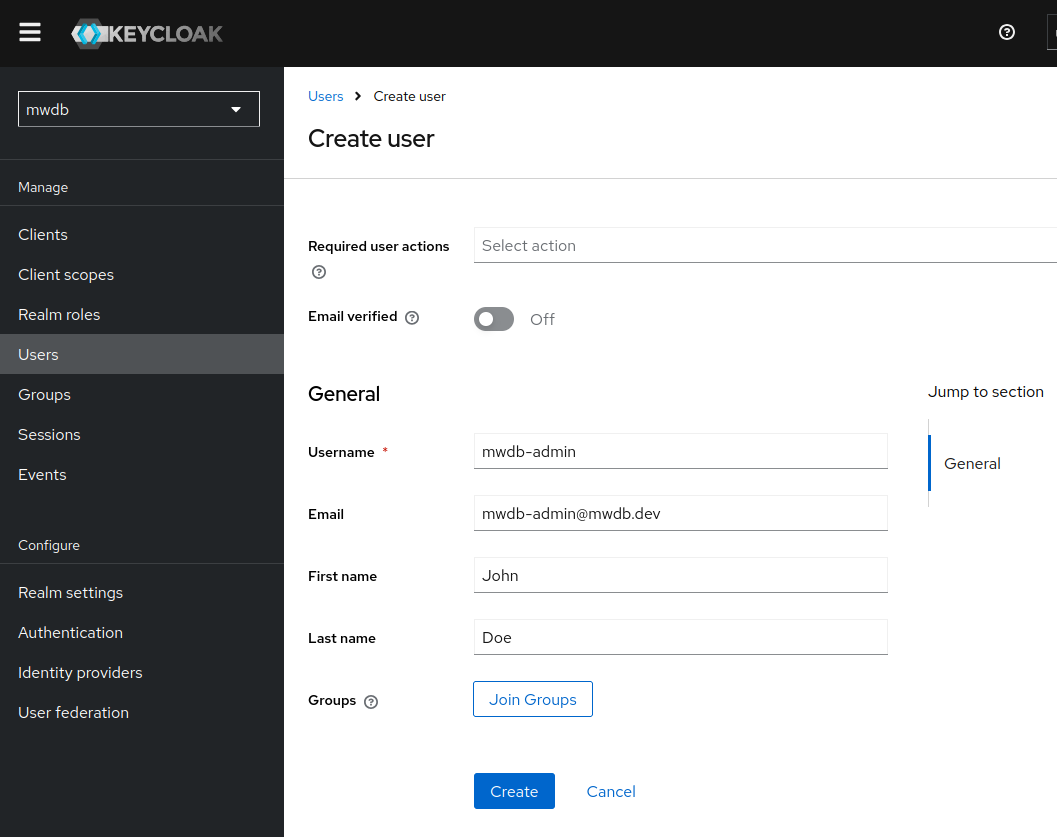
Then go to Credentials tab and Set password for that user. This time we will uncheck the Temporary option as we’re doing it only for demonstration.
Now, let’s try to bind the MWDB ‘admin’ account with ‘mwdb-admin’ user in Keycloak.
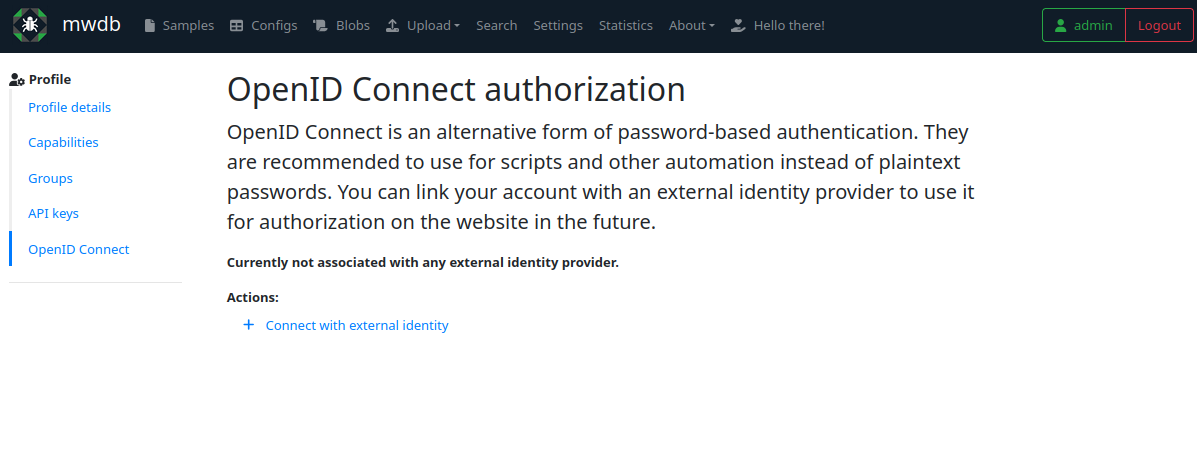
Go to the profile settings by clicking on admin button next to Logout and go to OpenID Connect tab. Then click on Connect with external identity and pick keycloak provider.
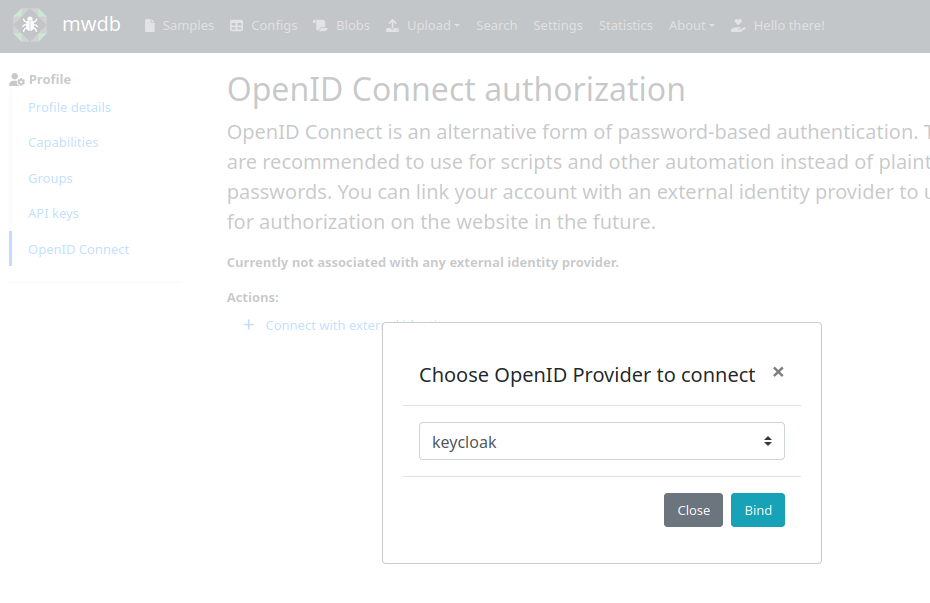
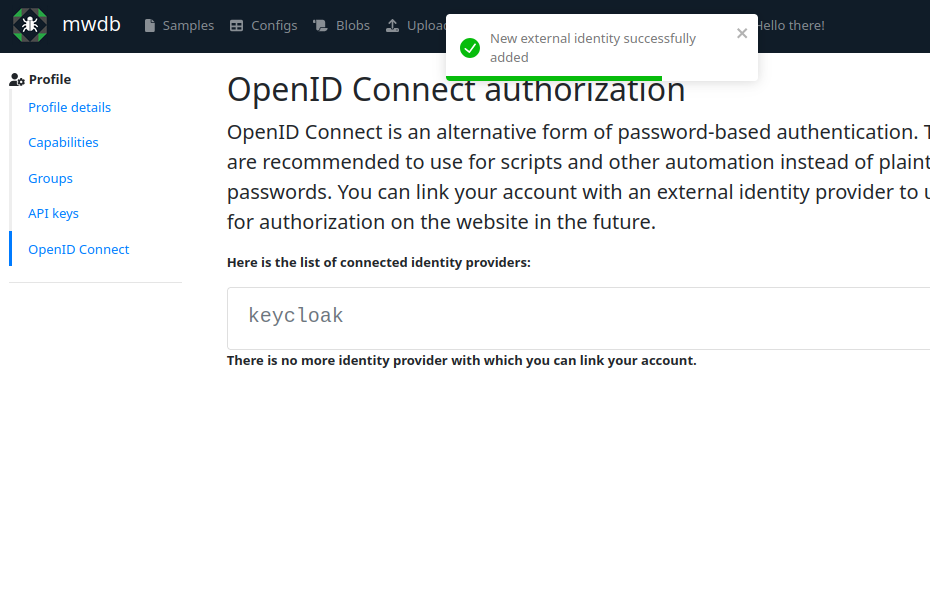
You’ll be asked for credentials by Keycloak. Provide mwdb-admin credentials. After logging in, you should be redirected back to MWDB and see keycloak as a connected identity provider.
Then you may try to logout and login back to admin by clicking on Log in with keycloak.
Step 4: Creating new MWDB account by logging in via Keycloak
Changed in version 2.17.0.
If OpenID user doesn’t have bound account in MWDB yet, MWDB can automatically create a user. This option is not enabled by default and can be turned on by setting:
enable_oidc_registration=1(MWDB_ENABLE_OIDC_REGISTRATION=1env var)or
enable_registration=1(MWDB_ENABLE_REGISTRATION=1env var) but this option also enables regular account registration form.
Note
Enabled enable_registration implies enabled enable_oidc_registration for compatibility reasons, as separate option for OIDC was added in v2.17.0.
enable_oidc_registrationis already enabled incompose.with-oidc.ymlso you don’t have to set anything in demonstration environment.
Then we may try to create user foo in keycloak (just like mwdb-admin user before) and try to login.
After trying to login as foo, you’ll set the following prompt:
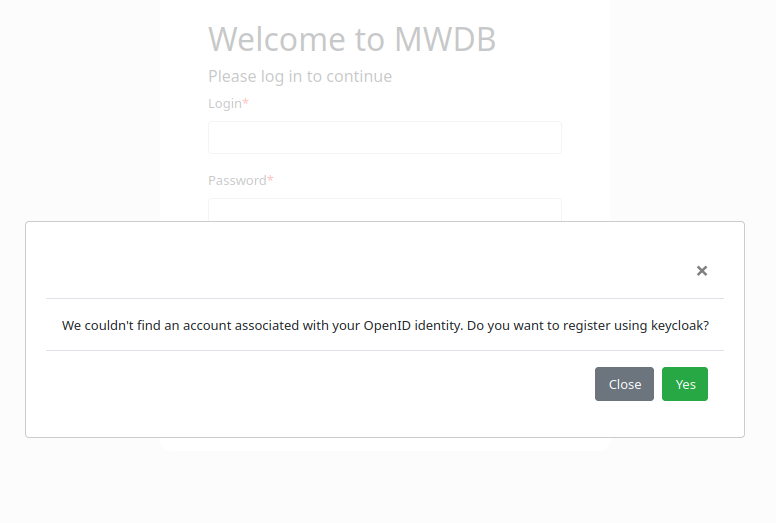
and account foo will be created in MWDB.
Note
Access management in this feature is pretty limited and created accounts are treated by MWDB just like regular accounts. If password-based authentication is enabled and correct e-mail address is set, OIDC users are able to set up password and log in to MWDB directly. Even if you limit the access by password, remember that user may create an API key and stay directly authorized by MWDB.
You may also limit this by removing manage_profile capability from registered group, so users can’t create API keys and initiate password reset. You can then create your own group, disable its Workgroup property and give that capability manually to the chosen users.
If you’re blocking access to the MWDB realm for a user on OIDC provider side, remember to also block the associated account in MWDB itself.
Access control for OIDC users
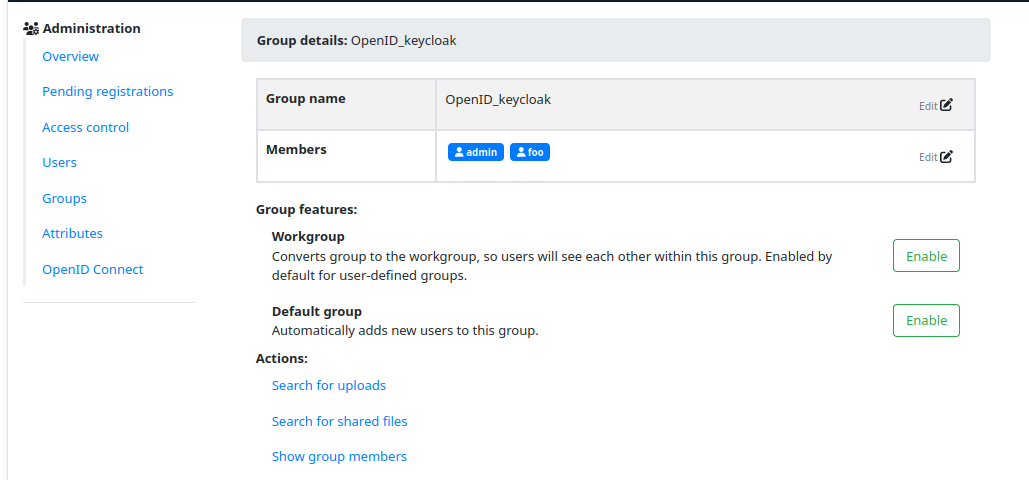
Users associated with OIDC provider are automatically added to OpenID_<provider name>. You can use this group to identify bound accounts and set capabilities solely for users authorized this way.
Approval requirement for accounts registered via OIDC
New in version 2.17.0.
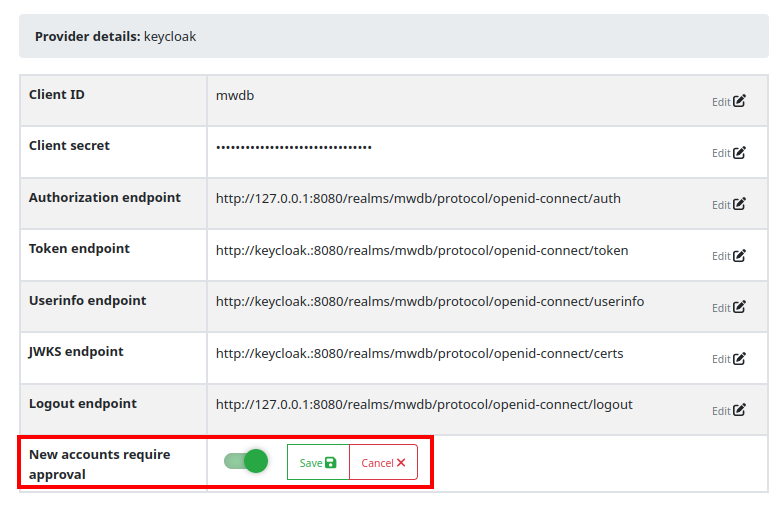
OpenID Provider may be set to require administrator approval before registering a new account, just like in the case of registration form.
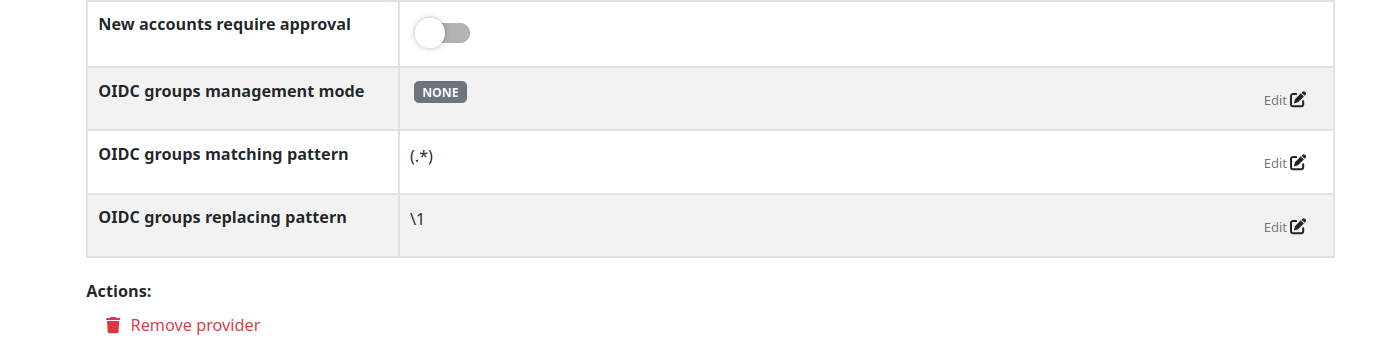
Go to the Settings, then OpenID Connect and click on
identity provider. Then switch on the New accounts require approval option and click Save.
If you’re following this guide, then you may remove the foo account and try to login using Keycloak. Instead of direct logging in, MWDB will notify user that account is waiting for approval.
Then log in as an ‘admin’ and check Pending registration tab in
Settings:
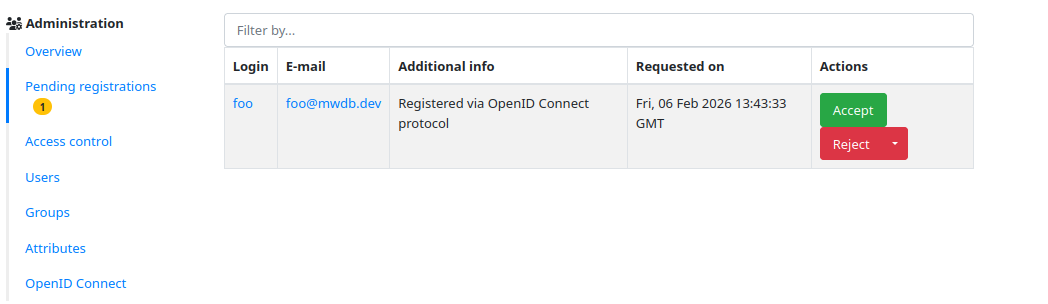
Then you can accept the request for an account, so foo will be able to log in.
“Pending registration” feature is originally designed for vetting requests coming from public registration form, so accepting account involves sending an e-mail notification with set password link when mail server is configured.
If password-based login is disabled, MWDB will use register_no_pass.txt template. If you want to keep password-based
login turned on, but don’t pass set password link to users - you can achieve this by changing register.txt mail template
and removing credentials part. To set up your own templates, change mail_templates_dir in configuration to point at your folder,
copy templates from https://github.com/CERT-Polska/mwdb-core/tree/master/mwdb/templates/mail and modify them accordingly.
Manage MWDB groups from OpenID Provider groups
New in version 2.18.0.
If your identity provider is configured to include user group information in the OpenID token, MWDB can automatically synchronize these groups with local MWDB groups.
This feature can be enabled or disabled separately for each provider in
Settings → OpenID Connect by selecting the appropriate provider.
The following synchronization modes are available:
NONE (default): Group synchronization is disabled. Groups included in the OIDC token are ignored.
FULL: User custom groups are fully synchronized with the groups included in the OIDC token.
Users are automatically added to all matching MWDB groups and removed from groups that are no longer present in the token. This means that users may be automatically removed from locally assigned MWDB groups if those groups are not included in the OIDC token.
The following groups are never removed automatically:
the user’s private group,
the provider group,
groups marked as default (for example, the
publicgroup).
MIXED: Users are added to or removed only from MWDB groups associated with the current OIDC provider. Local groups and groups managed by other providers remain unchanged, regardless of the groups included in the OIDC token.
If a referenced group does not already exist in MWDB, it is created automatically and linked to the corresponding OIDC provider.
User group membership is synchronized whenever the user authenticates to MWDB using the OpenID provider.
Group filtering and name mapping
Groups received from the OIDC provider can be filtered using the OIDC groups matching pattern=(.*) parameter.
This parameter accepts a regular expression and can be used both to:
filter which OIDC groups should be synchronized,
transform OIDC group names into MWDB group names.
Group name mapping is configured using the OIDC groups replacing pattern=\1 parameter.
The replacement pattern uses the result of the matching expression to generate the internal MWDB group name. Regular expression capture groups are supported.
Note
To synchronize only groups whose names in OIDC start with MWDB_, configure OIDC groups matching pattern
as: MWDB_(.*). You can then map these groups to MWDB groups prefixed with EXTERNAL_
by setting OIDC groups replacing pattern to: EXTERNAL_\1. With this configuration, the OIDC group
MWDB_MALWARE_ANALYSTS will be mapped to the local MWDB group EXTERNAL_MALWARE_ANALYSTS.
Managing existing groups in MIXED mode
By default, MIXED mode performs member synchronization only for new groups that were created by OpenID Provider during synchronization.
To manage already existing groups, you need to associate them with chosen provider in Settings.
You can do that by navigating to Settings → Groups → <choosing group> and editing the OpenID Provider field.
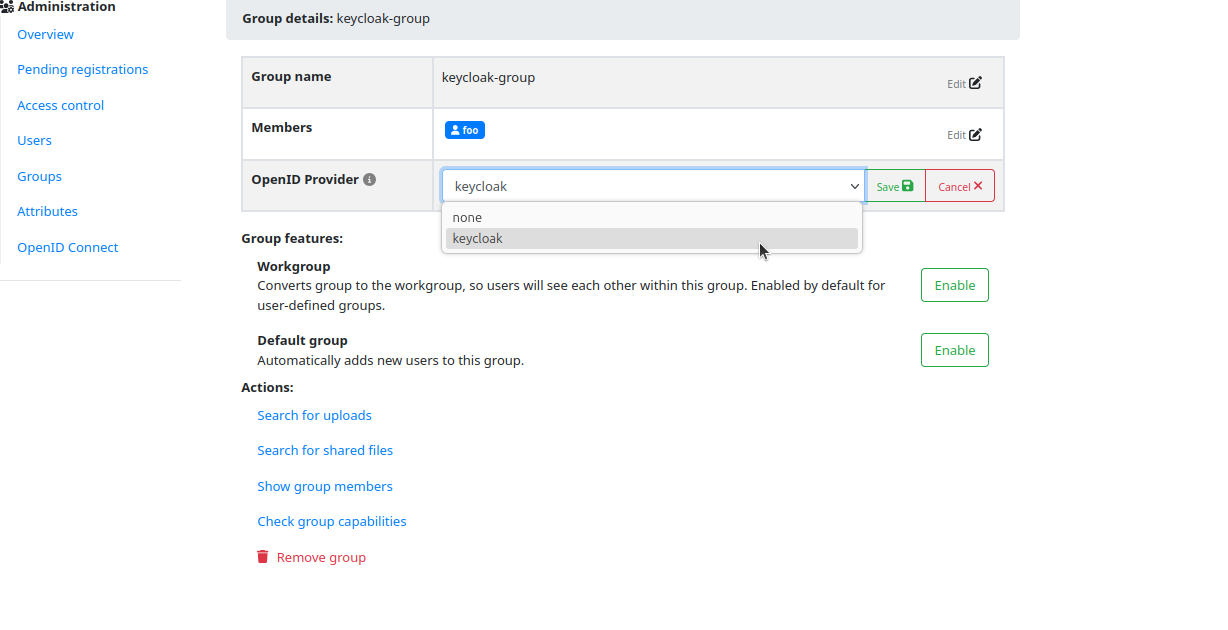
This setting can be also used for excluding the group from OpenID Provider management by editing this field to “none”.
Example: Setting up MWDB group management using Keycloak
Go to
Client scopesand create new client scope
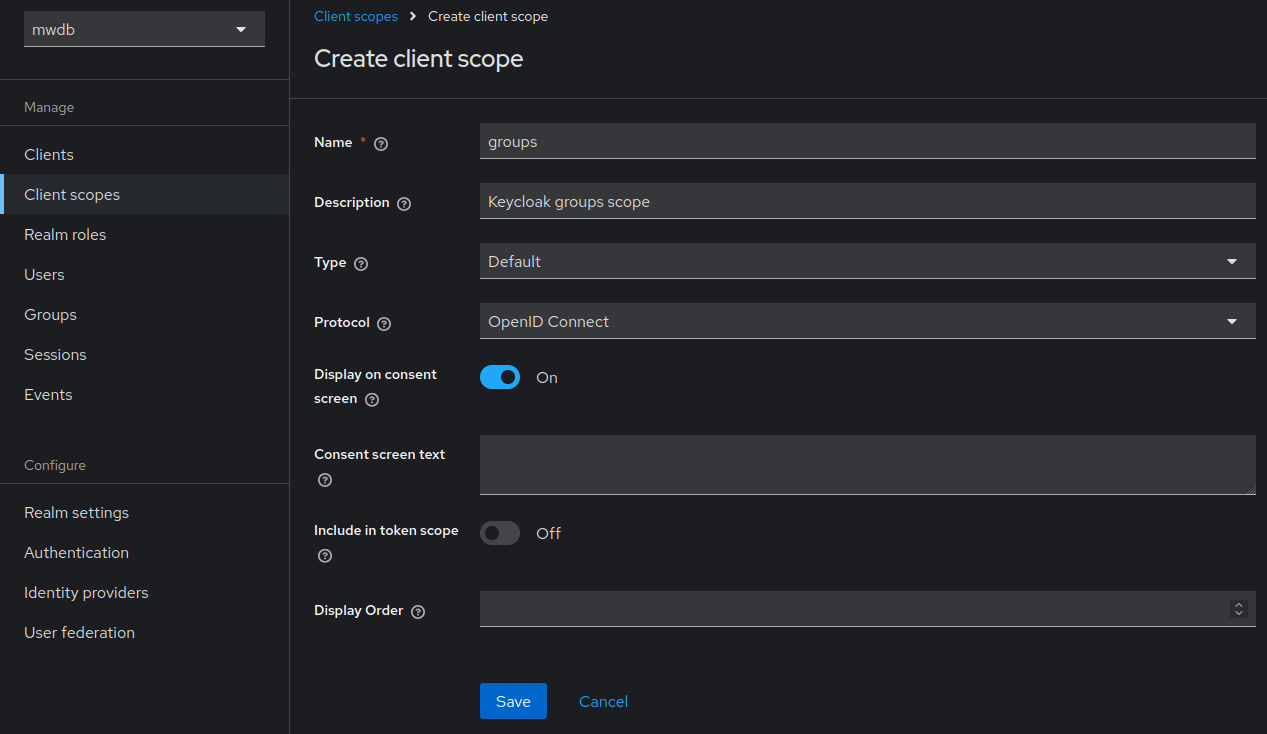
Then, navigate to
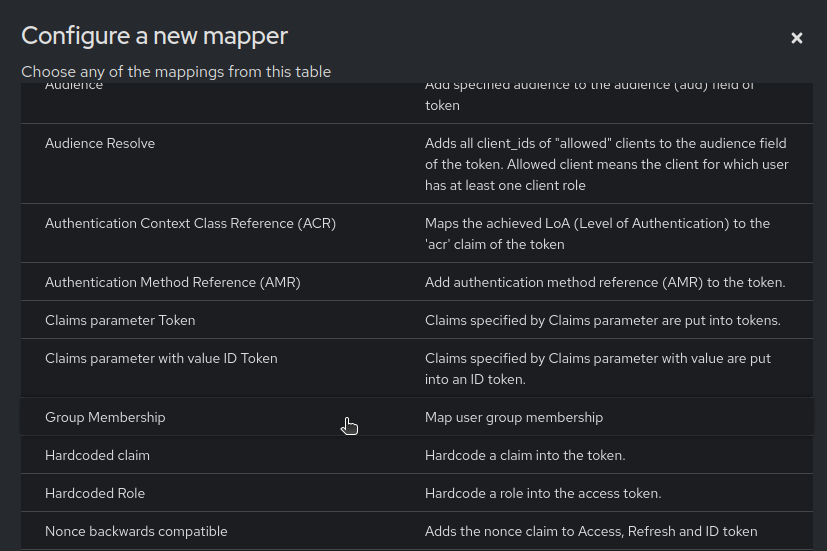
Mapperstab and chooseConfigure a new mapper. ChooseGroup Membership.
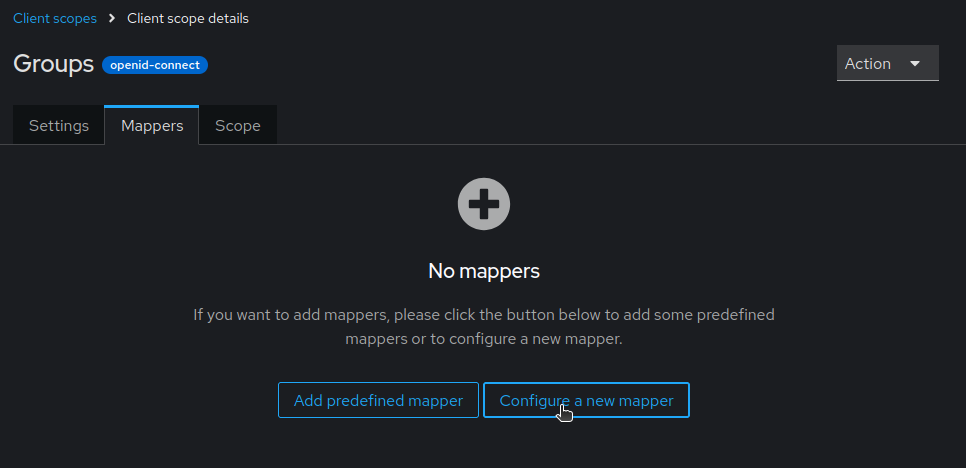
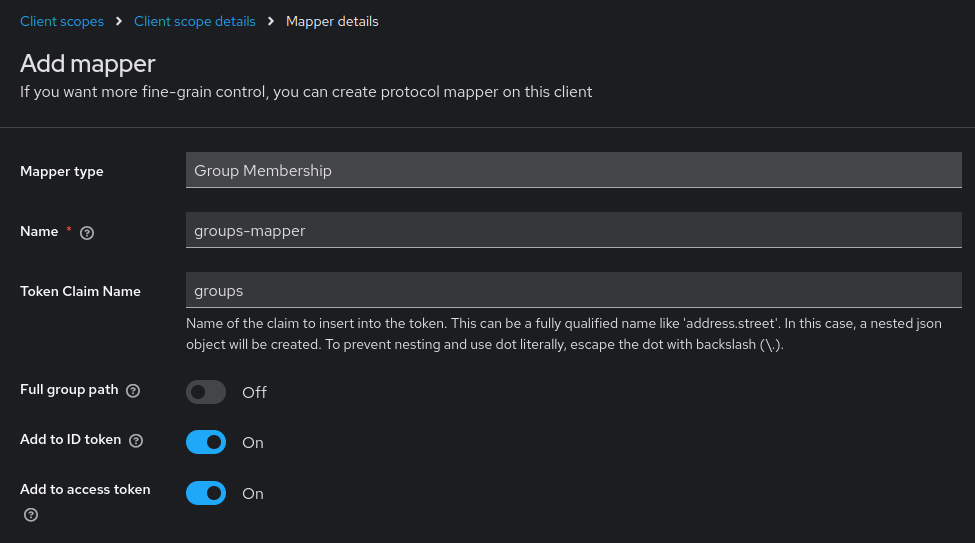
3. Then set Token Claim Name parameter as “groups” and turn off “Full group path”. Full groups paths are preceded with slash, so group names can’t be directly mapped to MWDB group names. If you want to use nested groups, you may need a regex that would provide a correct mapping to valid group name.
Then go to
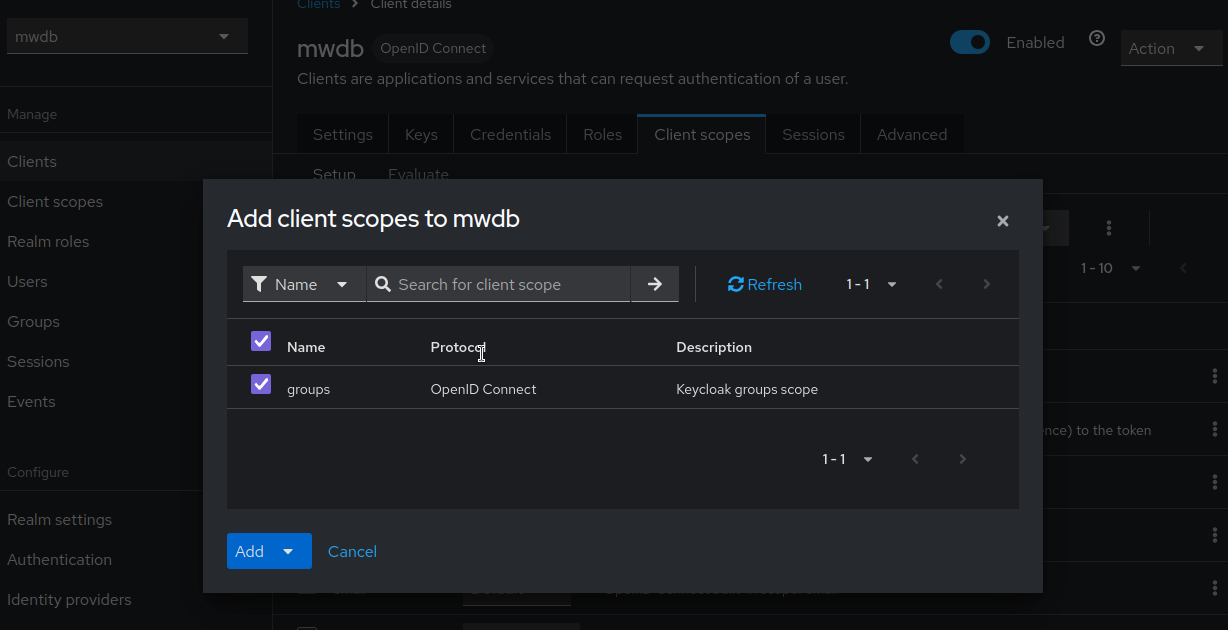
Clients, pick MWDB client and add createdClient scopeas a default scope for that client.
After setting MIXED or FULL management mode in MWDB configuration - Keycloak groups will be automatically synchronized on user logon.
Disable password-based authentication
New in version 2.16.0.
If you want to use only OpenID Connect for authentication and disable
regular password-based login, set enable_password_auth option in MWDB configuration to 0.